Conversion testing using Google Website Optimizer – WordPress case study
Having used Google’s Website Optimizer for client’s before, I thought we would share our experience from this week when we decided to run some experiments for the li’l engine blog – running WordPress version 2.8.
A quick intro
Google Website Optimizer is a free hosted service by Google that allows SEO’s and webmasters to perform content / layout tests on their website. For example, you may have a button on your website that reads “sign up” but would like to know if “Sign up Now” or “Join Now” would convert better. Using website optimizer one can setup an experiment using Google’s javascript to test the conversion rate of each button. There are two types of experiment available in website optimizer; Multivariate experiments – which runs up to 8 different sections / parts on the same page and A/B experiments which simply serves up different versions of the entire page.
Getting back to our WordPress experiment
When approaching an experiment it is always best to work from back to front, the process to follow;
- Define a clear goal
- Define which elements effect your goal
- Pick an element/s from the previous list to test in a new experiment
- Decide on either multivariate or A/B experiment.
- Create variations of the selected elements based on test type.
- Create a Website Optimizer experiment
1. Defining a clear goal
Using Analytics we noticed a very high bounce rate percentage on our homepage http://www.lilegnine.com/ from organic Google search traffic. Our goal for this experiment was simple – to reduce the current bounce rate from 69.76% to at least 60% – 55%.
Not only is this important for our traffic, but its also important for our search engine optimization efforts, since Google does treat high bounce rates as a negative indicator in its search ranking algorithm.
2. Define which elements effect your goal
This is the fun part of any conversion testing, put your analytical hat on and begin working out which elements could be effecting your goal, start with the obvious things such as size, color, speed etc and work your way to the smaller details.
Printing out a copy of your layout, circling and labeling elements helps, also working with a few partners can give you a better picture. Can’t decide on which elements? Here are 55 tips to help you decide!
For li’l engine the major elements identified were;
Detailed elements


Compare the old and new layout
3. Pick an element/s from the previous list to test in a new experiment
From the previous list, now it is time to group each of the elements together into seperate experiments. Each experiment should contain detailed elements that are related to each, this keeps each experiment tight and avoids too many variables and combination which will skew the result data. EG: you would group footer elements and header elements into separate experiments.
For lil engine, we decided having each post displayed in full including the full image was causing slow load speed and user’s having to scroll down too far to read the headlines. Therefor the element we needed to change was ‘the_content’ and also figure out a way to generate a smaller thumbnail.

New Layout
4. Decide on either multivariate or A/B experiment.
An important step, you must decide to run your experiment as multivariate or A/B at this stage, as you can not change this after wards ( have to create a new experiment ). I learned this the hard way on several occasions.
– Multivariate is suitable to test up to 8 different changes to a page in one experiment, good for static HTML but very difficult to setup for dynamic content.
– A/B testing on the other hand is good for testing major layout changes and easily configured for dynamic content ( such as wordpress ).
5. Create variations of the selected elements based on test type.
For li’l engine the experiment called for ‘the_content‘ to be changed to ‘the_excerpt_rss’ which is generated in themes/yourtheme/index.php, I started with multivariate experiments – but this proved too tricky to get website optimizer to render the php call to ‘the_content‘, after many hours of frustration and debugging I gave up and went with simple A/B experiments.
The problem is caused by website optimizer’s inability to handle PHP code ( cross domain PHP calls ), there were a few solutions offered such as writing another piece javascript on your server which grabs the rendered PHP than parsing the html content to website optimizer.
I have a few years worth of programming under my belt, still I was unable to figure out a solution to implement multivariate experiments with PHP data.
5.a How to setup A/B experiments for index.php in WordPress
The trick here is to create a new page using templates in WordPress, as just duplicating the themes/yourtheme/index.php file will not work.
- Create a new template file called index_1.php in themes/yourtheme/
- Open themes/yourtheme/index.php in dreamweaver
- Copy and paste all the code from themes/yourtheme/index.php to themes/yourtheme/index_1.php
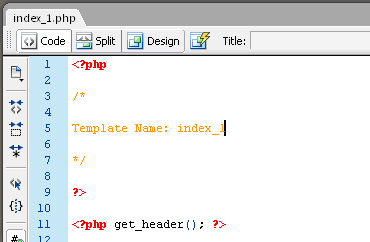
Add the PHP template label to themes/yourtheme/index_1.php- Save and upload index_1.php and log into your WordPress admin
- From the main menu goto – pages > ‘add new’
- In the template drop down menu, select the ‘index_1‘ template you just created. ( if not check the template tags in step 4 )
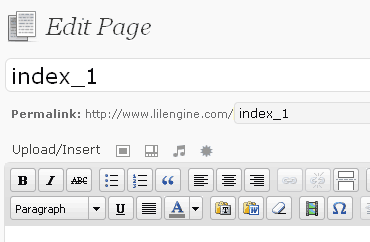
Enter the page name and URL as index_1 ( this URL will be our B homepage )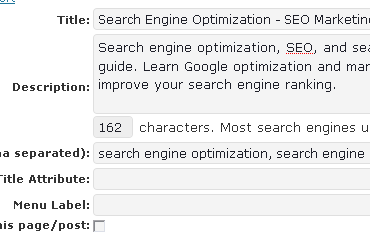
Re-enter in the page title and Meta information to be the same as the current homepage.
( we are not testing these in our experiment )- You should not need to enter in any content in thepage body, just leave it blank
- Save and publish your page, if you browse to the new page now it should display exactly the same as the homepage.
- Back in Dreamweaver, make the necessary changes to index_1.php for your experiment
The next step is to make the necessary changes to themes/yourtheme/index_1.php , for our test we;
- Changed ‘the_content‘ to ‘the_excerpt_rss‘
- added new style classes
- installed the plugin ‘thumbnail-for-excerpts‘ which generates a small thumbnail from the large post image.
6. Create a Website Optimizer experiment
Finally the last step is to create an A/B experiment in Google website optimizer. I won’t go into details here as Google has a very clear and comprehensive guide on how to create an A/B experiment, the important part to understand is that your current blog homepage is to be the ‘Original page URL‘ and the new www.yourblog.com/index_1/ as the ‘Page variation URL‘.
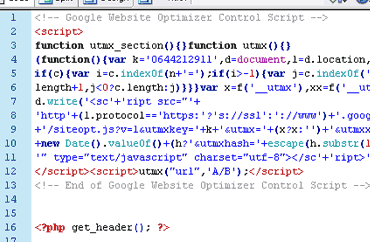
During the setup process you will be given 3 bits of javascript code. Its important that you don’t place the code in the header / footer includes such as ( <?php get_header(); ?> ), only place the codes in index.php and index_1.php .
Validate the Website Optimizer code setup and the final stage is to set the amount of traffic to send through this experiment, we have set the maximum 100% as we only have 1 experiment going for the WordPress blog homepage.
What happens now? With A/B testing, Google’s javascript will execute a transparent redirection to the new index_1 page for 50% of your traffic and the really clever part is how GWO can save a cookie on each visitors browser, which displays the same variation for that user everytime, this means the results data can’t be skewed with multiple visits by the same user.
Our Results: We will post the results from our experiment in a few weeks time and let you know our findings!
Conclusion
In this post we covered the basics of planning for a Google Website Opimizer experiment, from defining goals to implementing A/B testing for WordPress. Using GWO can be tricky for dynamic content in WordPress, but with good knowledge and planning you can make your blog work better and harder for you.
Conversion testing is not only important to generate more sales / ad revenue for your blog, but it is also important for search engine optimization by reduction of bounce rate and site speed.
Please share this article if you found it useful and post any comments / questions you may have.
Share this post http://bit.ly/52vbPe | Sphinn this post


